
A recurring trend in IT security is the overused use of fashionable terms, which do not cover the same reality for the customer or his service provider. SecOps (Security Operations) is the perfect example here. In order to clarify the debates in the professional world, I therefore wanted to use my pentest laboratory prototype to improve it as follows. The initial principles remain unchanged, namely:
- The prototype must be hosted under Windows: this operating system is by far the most common among customers. For the use of security tools such as vulnerability scanners under Linux, it will therefore be necessary to virtualize a Linux operating system.
- The prototype must host vulnerable systems such as Metasploitable 2 or DVWA depending on the need.
The improvements over the first version are as follows:
- Favor light Docker containers rather than heavier Virtualbox images
- Have tools not only for attackers (red team) but also for defenders (blue team) while keeping one or more vulnerable systems (victim).
You might say, what is the point of taking up an existing subject on the sole pretext of improving it ? The challenge here is less to talk about the final solution than about its hosting and its multiple associated failures that I have encountered.
A handmade Pentest lab
For once, let’s start at the end.
The local pentest laboratory solution made available by Oliver Wiegers on Github is a work of art. Kudos to him!
- For the Red team is made available an instance of Kali Linux with its latest version tools in a Docker image
- For the Blue team, monitoring tools such as Grafana are available for visualization, but also Loki and Prometheus to provide logs and metrics to Grafana.
- Finally, the exposed vulnerable services are numerous and diversified (juice-shop, hackazon, tiredful-api, ninjas).
So I installed the lab on an Ubuntu PC to find out if it was as interesting as it looked.
- Installing Ubuntu dependencies
sudo apt install docker docker-compose docker.io jq python3-pip- Installation of the “yq” library written in Python and not in Go
sudo pip3 install yq- Generation of an SSH key if it does not already exist
sudo ssh-keygen- Cloning the Github directory and validating satisfied dependencies for installation
$ git clone https://github.com/oliverwiegers/pentest_lab
$ cd pentest_lab
$ ./lab.sh -C- All the lights should be green and we can proceed with the installation of the lab.
sudo ./lab.sh -uThe installation takes a long time especially because of the updating of Kali Linux tools. Once the process is finalized, the IP addresses are statically defined to facilitate the SSH connection to the Kali image.
- Red team services start at IP 10.5.0.5
- Blue team services start at IP 10.5.0.50
- Victim services start at IP 10.5.0.100
- Monitoring services start at IP 10.5.0.200
Everything works fine on a non-virtualized Linux instance. Have a good time !
Once this step is over, the idea is to determine how to virtualize this laboratory under Windows. This is where the trouble begins.
Virtualization options and their technical limits
The prototype being functional, I started to test several virtualization methods.
As a reminder, 2 main architectures exist. Virtual machines (VM) as well as containers such as the Docker solution make it possible to virtualize applications on a host system such as Microsoft Windows, Linux or MacOS.
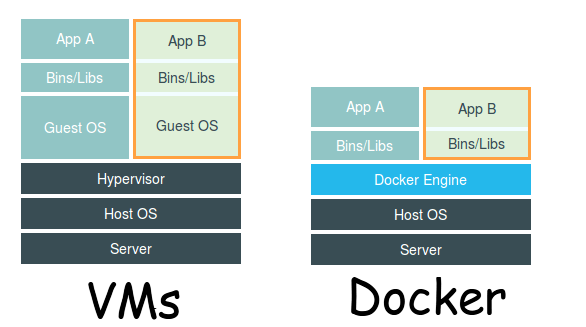
- The advantage of Docker being its lightness because the client operating system is not entirely virtualized like in a VM.
- The advantage of a VM is its configurability in terms of hardware resources, but unlike Docker, it is a heavier and more resource-intensive solution.
To complete this technical panorama, let’s dwell for a moment on 2 technical bricks of virtualization under Windows, WSL2 and Hyper-V:
- Hyper-V, also known as Windows Server Virtualization, is a virtualization system that allows a physical server to become a Hypervisor and thus manage and host virtual machines.
- Windows Subsystem for Linux (WSL) is a compatibility layer for running Linux binaries natively on Windows 10, Windows 11 and Windows Server 2019. The 2nd version of WSL, WSL2 was released in May 2019.
In summary, Hyper-V is the technical brick for running virtual machines in Windows. WSL2 is the technical building block for running Docker containers. The fact that WSL2 itself relies on part of the Hyper-V architecture to function makes this beautiful subject, which is the exciting world of virtualization, more complex.
So Oliver Wiegers’ prototype virtualization options are:
- Installing an Ubuntu image directly into Windows using WSL 2
- Installing an Ubuntu image via the Canonical editor and its Multipass solution (which uses WSL2)
- The use of Docker Desktop under Windows based either on Hyper-V or on WSL2.
Regarding the first option, the installation of the Ubuntu image in Windows via WSL2 went well. Launching the installation script is possible but I never managed to finalize its installation. The script consistently crashes in Kali Linux update without being able to get detailed error logs of the issue.
Regarding the second option, using Canonical’s Multipass solution works similarly to Docker. Thus, launching the tool from the command line via Powershell under Windows works well (cf. Ubuntu official documentation). Unfortunately, as soon as I try to generate an image with a large enough disk size for the prototype, the image generation conflicts with Hyper-V and I am unable to generate an IP address for the image .
My third and last option is therefore the use of Docker Desktop with WSL 2 to generate an Ubuntu image that itself includes a Docker-compose to build the prototype. For docker-compose to work, it is necessary to take an image with SystemD installed, which is not the case in the default Ubuntu image provided in Docker.
- Launch Image as a Daemon
docker run -d --name systemd-ubuntu --privileged -v /sys/fs/cgroup:/sys/fs/cgroup:ro jrei/systemd-ubuntu- Enter the container then update it
$ docker exec -it systemd-ubuntu /bin/bash
$ apt update && apt full-upgrade
$ systemctl start docker
Finally, this third and last solution works and allows me to use the pentest lab locally on Windows !
In summary, this prototype allowed me to dig into Linux virtualization solutions under Windows in order to host the Pentest laboratory created by Oliver Wiegers. These multiple and varied solutions are interesting to explore in order to understand the philosophy of the tools but also the compromises to be made between lightness and the ability to configure the tools. The failures encountered were in the end formative and instructive to understand the current state of the market in the field.
“Success is the failure of failure.”
Delphine Lamotte